Garbage Disposal Leaking? How to Find the Leak and Fix It
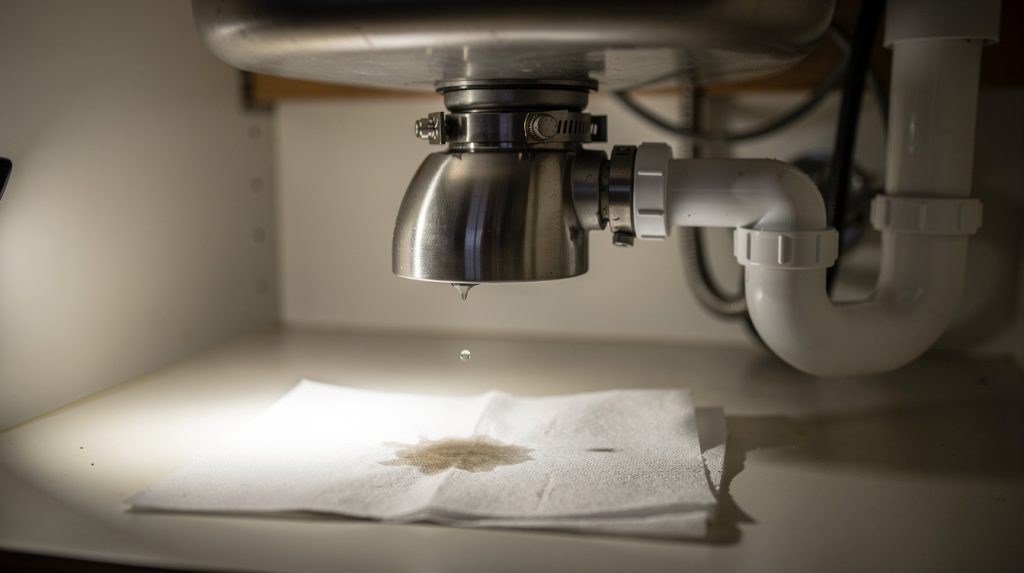
You reach under the sink for the dish soap and your knuckles come back wet. Maybe there’s a warped ring on the cabinet floor, or that musty smell that means water has been sitting somewhere dark for a while. The disposal is the obvious suspect, and it usually is. But here’s the thing most homeowners get wrong: the water dripping off the bottom of that metal canister almost never started at the bottom. Water runs downhill, collects on the lowest curve of the housing, and drips from there no matter where it got in.
So the whole job is figuring out where it actually enters. There are exactly three zones a disposal can leak from, and which one you’re dealing with decides everything — a $4 fix with plumber’s putty, a $12 gasket, or a replacement unit. This guide walks you through a dye test that pinpoints the zone in about twenty minutes, then the repair for each one. Bring a flashlight and a roll of paper towels.
First: Kill the Power and Clear the Cabinet
Before anything else, unplug the disposal. Most units under Florida sinks plug into an outlet inside the cabinet — reach back and pull it. If yours is hardwired, go to the breaker panel and shut off the circuit, then flip the wall switch a couple of times to confirm it’s dead. A disposal that kicks on while your hand is near the grinding chamber is a trip to the ER, and it takes ten seconds to prevent.
Empty the cabinet completely. Cleaning bottles, the trash bin, the extra sponges — all of it out. Then wipe the cabinet floor bone dry with a towel and lay down a couple of fresh, dry paper towels directly under the disposal. You need a clean baseline. If the wood is stained and swollen, note where the darkest area sits; that’s usually right under the drip point.
While you’re in there, look at the whole picture. A wet cabinet isn’t always the disposal. Check the supply line shutoff valves, the P-trap joints, and the dishwasher hose. If your dishwasher has been acting up too, our guide on why a dishwasher leaks from the bottom covers the overlap between those two appliances, since they share plumbing under the same cabinet.
The Three Leak Zones (and Why It Matters So Much)
Think of the disposal as three separate sealed areas stacked on top of each other.
- Top zone: where the disposal meets the sink. This is the sink flange, the plumber’s putty seal, and the mounting assembly with its ring and three screws. Leaks here are common and cheap to fix.
- Side zone: the two ports on the side of the unit. One is the dishwasher drain inlet up top, the other is the discharge tube going to the P-trap. Both use gaskets and clamps. Also cheap.
- Bottom zone: the actual shell of the unit, below the grinding chamber. If water is coming through the housing itself or out the reset button area, the internal seal around the motor shaft has failed. That’s not repairable.
Roughly speaking, in the homes we service around Tampa, Wesley Chapel, and Land O’ Lakes, top leaks are the most common, side leaks come second, and bottom leaks are the least common but the most expensive. The good news is you can tell them apart without any tools.
The Dry-and-Dye Test: Finding the Leak in 20 Minutes
This is the same method a tech uses on a service call, and it works because it separates “water sitting in the sink” from “water running through the drain.”
Step 1: Get everything bone dry
Towel off the entire outside of the disposal — top collar, sides, bottom curve, and the electrical cord. Dry the drain pipe and the P-trap too. Then wrap dry paper towels around the unit in three bands: one just under the sink flange, one around the middle where the ports are, and one draped under the bottom. Toilet paper works even better if you have it; it shows the first drop instantly.
Step 2: Fill and hold
Plug the sink with a stopper and fill it about two-thirds with water. Add ten or twelve drops of food coloring — dark blue or red shows best against white paper. Let it sit for five full minutes without touching anything, then check your paper towels with a flashlight.
If the top band picks up color while the sink is just sitting full, your leak is at the sink flange. Standing water is pressing against that seal, and it’s failing. This is the single most common disposal leak we find.
Step 3: Fill and release
Swap in fresh dry towels. Now pull the stopper and let the full sink drain all at once. That surge puts real pressure and volume through the discharge side, which is exactly what a slow gasket leak needs to reveal itself. Watch the middle band and the discharge tube joint while it drains.
Step 4: Run the dishwasher
If the disposal has a dishwasher hose connected, run a short cycle or just the drain portion. Dry towels again first. A leak that only appears when the dishwasher pumps out points straight at the dishwasher inlet nipple and its hose clamp.
Step 5: Check the bottom last
If the top and middle bands stayed dry through all of that, but the bottom band is wet — especially colored — look closely at the seam around the bottom plate and the little red reset button. Water coming out there is the internal shell seal, and we’ll talk about that below.
Top Leaks: The Sink Flange and Mounting Ring
The flange is the metal ring that sits in the sink drain opening. It’s sealed to the sink with plumber’s putty, then locked down from underneath by a mounting assembly — usually a snap ring, a backup flange, and three screws that pull everything tight.
Try tightening first
Sometimes the fix is just three turns of a screwdriver. Look up under the sink at the mounting assembly. You’ll see three screws spaced evenly around the collar. Snug each one a little at a time, going in rotation like you’d tighten lug nuts on a wheel — a quarter turn on one, then the next, then the next, around twice. Even pressure matters. Cranking one down all the way first tilts the flange and makes the leak worse.
Don’t gorilla it. These are small machine screws in soft metal, and stripping one turns a ten-minute job into a two-hour one. Snug plus a little is right. Then rerun the fill-and-hold test.
If tightening doesn’t do it, re-putty the flange
Old plumber’s putty dries out, shrinks, and cracks — typically after eight to twelve years. Once it does, no amount of tightening helps.
- Support the disposal from below (a paint bucket or a stack of books works) and turn the lower mounting ring to release the unit. It’s heavy — expect 8 to 15 pounds.
- Loosen the three screws, pop the snap ring off with a flathead, and lift the flange up out of the sink.
- Scrape every bit of old putty off the flange and the sink opening. A plastic putty knife won’t scratch stainless. Wipe both with rubbing alcohol so the new putty bonds.
- Roll fresh putty into a rope about as thick as a pencil and wrap it around the underside lip of the flange. Overlap the ends slightly.
- Press the flange down into the drain opening firmly and evenly. Putty should squeeze out all the way around — that’s what you want to see. Set a weight on it while you work underneath.
- Reinstall the backup flange, snap ring, and screws, tightening in rotation as described above. Trim the squeeze-out with a fingernail or plastic scraper.
One note for anyone with a granite composite or fireclay sink: skip the putty and use 100% silicone instead. Petroleum-based putty can leave a permanent dark stain on porous sink materials.
Side Leaks: Discharge Tube and Dishwasher Inlet
The discharge tube gasket
The discharge tube is the elbow that carries wastewater from the disposal to the P-trap. It attaches with a rubber or fiber gasket held by a metal flange and two bolts. That gasket flattens and hardens over time, and Florida’s hard water leaves mineral deposits on the sealing face that stop it from seating flat.
Put a bucket under it, loosen the two bolts, and pull the tube free. Look at the gasket — if it’s cracked, compressed thin, or crusted with white scale, replace it. They cost a few dollars at any hardware store and come in standard sizes. Clean the mating surface on the disposal with a scrub pad, seat the new gasket, and tighten the two bolts alternately, a little on each side, until snug. Overtightening cracks the plastic flange, so stop when it stops turning easily.
Check the P-trap connections while you’re down there too. Slip nuts back off over time and it’s easy to blame the disposal for a leak that’s really six inches downstream.
The dishwasher drain hose
The dishwasher hose clamps onto a nipple near the top of the disposal. Two things go wrong. First, the hose clamp loosens or the rubber hose end hardens and cracks — replace the clamp with a stainless worm-drive clamp and cut back an inch of hose to a fresh section if it’s stiff.
Second, and this one catches a lot of people: the knockout plug. New disposals ship with a solid plug molded into the dishwasher inlet. If you’re connecting a dishwasher, you have to knock it out with a screwdriver and hammer from inside the grinding chamber — and then retrieve the plug disc from the chamber. Leave it in there and it rattles around and can jam the impellers. Forget to remove the plug at all and the dishwasher can’t drain, which backs water up and forces it out around the hose clamp or into the dishwasher itself. If your dishwasher is holding water at the end of a cycle, our post on troubleshooting a dishwasher that won’t drain covers the knockout plug and the other usual causes.
If you’ve worked through the tightening and gasket steps and water is still showing up, that’s a fine place to hand it off. The team at SkyBreeze Appliance Repair handles disposal and dishwasher drain problems across Pasco and Hillsborough counties, and a leak you can’t locate is worth a second set of eyes before the cabinet floor gives out.
Bottom Leaks: Why This One Is Fatal
Inside the disposal, a motor shaft runs up into the grinding chamber. Where that shaft passes through the chamber floor, there’s a seal keeping wastewater out of the motor. That seal is not a serviceable part. It isn’t sold separately, it isn’t accessible without destroying the housing, and no manufacturer supports replacing it.
When it fails, water seeps down into the motor housing and finds the lowest exit — usually the seam at the bottom plate or right around the reset button. Which is why a drip at the reset button is such a reliable tell: that button sits at the very bottom center of the unit.
Two reasons to replace immediately rather than nurse it along. One, water in the motor means the windings are getting wet, and a shorted disposal on a wet cabinet floor is a genuine shock and fire risk. Two, the leak only accelerates — corrosion inside the shell widens the path.
Some people try epoxy or plumber’s tape on the seam. It buys a week, maybe two, and then it leaks again from a slightly different spot. Skip it. A replacement disposal runs $90 to $250 depending on horsepower, and the swap itself is straightforward if the existing mounting hardware is in good shape.
How Long Disposals Actually Last in Florida
The industry number is 8 to 15 years. In Florida, plan on the low end of that — 8 to 12 is realistic, and units on well water in Pasco or Hernando County sometimes tap out at 7.
Hard water is the reason. Tampa-area municipal water runs high in calcium and magnesium, and well water out toward Shady Hills and Dade City can be harder still, often with sulfur and iron in the mix. Every time water sits in the grinding chamber between uses, minerals precipitate onto the steel. Over years that scale traps moisture against the metal, and the galvanized or painted steel shells used on budget units start to pit and rust from the inside. That’s the actual failure path for most bottom-seal leaks down here: corrosion, not wear.
A few things genuinely extend the life:
- Run cold water for 20 seconds after every use so nothing sits in the chamber.
- Once a month, grind a tray of ice cubes with a half cup of coarse salt. It scours the grind ring and knocks scale loose.
- Skip the citrus-peel trick if your unit already has corrosion — the acid helps with odor but doesn’t help old steel.
- Never pour grease down it. It cools, coats, and holds mineral scale in place.
- If you’re replacing, pay up for a stainless steel grinding chamber and shell. In hard water it’s the difference between 8 years and 15.
We wrote more about how our water chemistry chews through appliances in this guide to Florida hard water damage, and the same scale that kills disposals is what fogs your glassware and clogs dishwasher spray arms.
When to Repair and When to Just Replace
Straightforward rules of thumb:
- Repair if the leak is at the flange, the discharge gasket, or the dishwasher hose, and the unit is under about 8 years old. These are cheap parts and the motor is fine.
- Replace if water comes from the shell or reset button, full stop.
- Replace if the unit is 10+ years old and already needs a repair. You’ll be back under there within two years anyway.
- Replace if you see rust bleeding through the housing paint, or if the grinding chamber has visible pitting when you shine a light down the drain.
- Replace if the unit hums but doesn’t spin even after you free the flywheel — that combined with a leak means the motor is on its way out. We cover the humming diagnosis in our post on a disposal that hums but won’t spin.
If you’re on the fence, our repair vs. replace cost guide lays out the math for appliances generally, and disposals sit at the low-cost end where replacement usually wins earlier than you’d expect.
What to Do If the Cabinet Is Already Water-Damaged
Fixing the leak is only half the job. Particleboard cabinet bottoms swell, delaminate, and in our humidity they grow mold fast — sometimes within 48 hours of getting wet.
Once the leak is stopped, pull everything out and let the cabinet dry completely. A small fan pointed into the open cabinet for a day helps a lot. If the board is soft when you press it, or you see black spotting, it needs to be cut out and replaced. Cabinet bottom replacement kits are inexpensive and a lot of people just cut a sheet of 1/4″ plywood to fit and seal it. Adding a plastic under-sink liner tray afterward is cheap insurance; the next leak becomes a puddle in a tray instead of ruined cabinetry.
Check the wall behind the cabinet too, and the flooring at the toe kick. Water travels along the bottom of the cabinet and out the front edge more often than people realize.
When to Stop and Call Someone
Call a pro if any of these apply. You find water near the electrical connections or the outlet inside the cabinet. The disposal tripped the breaker and won’t reset. You’ve replaced the flange putty and gaskets and it’s still leaking. There’s rust and pitting on the shell. Or you simply don’t want to wrestle a 15-pound motor over your head in a dark cabinet, which is a completely reasonable position.
Also stop if you find anything gas-related under there — a gas line running through the cabinet, or a gas smell. Don’t touch it, don’t investigate, and call a licensed gas technician. That’s outside what we or any appliance tech should be handling.
For everything else, SkyBreeze Appliance Repair works on disposals, dishwashers, refrigerators, washers, dryers, and ovens throughout Tampa, Wesley Chapel, Lutz, Land O’ Lakes, Hudson, Zephyrhills, Dade City, and The Villages. If you’d rather have someone locate the leak and swap the unit the same day, that’s a normal call for us.
Quick Reference: Leak Location to Fix
- Water only when the sink is full and standing: sink flange seal. Tighten the three mounting screws in rotation; if that fails, re-putty the flange.
- Water only when the sink drains: discharge tube gasket or P-trap slip nut. Replace the gasket, tighten alternately, don’t overtighten.
- Water only when the dishwasher runs: dishwasher inlet hose clamp, cracked hose end, or a knockout plug that was never removed.
- Water from the shell seam or the reset button, any time: internal shell seal. Replace the unit.
- Water at the top but the flange is tight and new: check for a cracked sink drain opening or a warped mounting ring.
Dry it, dye it, and let it tell you where it’s coming from. Ninety percent of the time you’ll have your answer in one round of the test, and two out of three answers are a repair you can finish on a Saturday morning.