How to Move Major Appliances Without Wrecking Them
A surprising share of the appliance repair calls we run in the weeks after moving season have nothing to do with age or wear. The fridge worked fine in the old house. The washer worked fine in the old house. Then two guys and a hand truck got involved, and now the fridge won’t get cold and the washer walks across the laundry room like it’s trying to leave.
Major appliances are heavy, awkward, and full of parts that don’t appreciate being tipped, jolted, or set down hard. The good news is that almost all moving damage is preventable, and the prevention is mostly a matter of knowing which two or three things matter for each machine. Here’s the whole rundown, appliance by appliance, plus the general moving technique that keeps your floors and your back intact.
Before You Touch Anything: Measure
The single most common moving-day disaster is discovering the refrigerator doesn’t fit through the doorway after you’ve already got it on the dolly and halfway down the hall.
Measure the appliance’s width, depth, and height. Then measure every doorway, hallway turn, and stair landing on the route, at both houses. Compare the appliance’s smallest dimension against the doorway’s clear opening — not the frame width, the actual gap when the door is open.
- If the fit is tight, you can usually gain an inch or more by taking the door off its hinges — the house door, not the appliance door.
- On refrigerators, removing the doors is a standard part of the process for narrow openings. Most french-door and side-by-side models have removable doors with hinge covers on top; take a photo before you disassemble anything, and put the screws in a labeled bag taped to the unit.
- Watch the handles. Fridge and range handles stick out three or four inches and are usually the actual limiting dimension.
Also plan the route with someone. Where does the dolly turn? Which corner is the tight one? Is there a threshold to bump over? Ninety seconds of walking the path saves a gouged doorframe.
Refrigerators: The One Where Timing Matters
Refrigerators are the appliance people damage most often, and the damage is usually invisible until you plug it back in.
Prep, in Order
- Empty it completely, ideally a day or two ahead. Eat down the perishables. Move anything you’re keeping into coolers.
- Turn off the ice maker and shut off the water supply at the valve behind the fridge or under the sink. Disconnect the water line and drain it into a bucket — there’s more water in there than you expect.
- Defrost the freezer. Unplug it 8 to 24 hours before the move and leave the doors open with towels underneath. Melting frost in a moving truck makes a mess and can get into places it shouldn’t.
- Clean and dry the interior. A sealed-up damp fridge in a Florida moving truck grows mold with impressive speed. Wipe it out and prop the doors open a crack with a rolled towel for the trip if you can.
- Remove or secure shelves, bins, and drawers. Glass shelves ride separately, wrapped. Anything staying inside gets taped down. Loose glass in a moving fridge is exactly the disaster it sounds like.
- Tape the doors shut for transport with painter’s tape or a moving strap — not duct tape, which pulls the finish off.
Transport It Upright, and Here’s Why
Your refrigerator’s compressor sits in a sealed housing with lubricating oil pooled in the bottom. When the unit is tipped past roughly 45 degrees — and especially if it’s laid flat — that oil migrates out of the compressor and into the refrigerant lines. Plug the fridge in before the oil drains back, and the compressor runs starved. That’s how a fridge that worked perfectly last week becomes a fridge that hums but never gets cold.
So: move it upright on a dolly whenever you can. If the truck absolutely requires laying it down, lay it on the side opposite the compressor lines where possible, keep it there as briefly as you can, and then follow the settle rule religiously.
The Settle Rule
Once the fridge is in place at the new house, stand it upright and leave it unplugged:
- Moved upright the whole way: 4 hours before plugging in.
- Tilted significantly or laid down briefly: 8 to 12 hours.
- Transported on its side: a full 24 hours.
The rule of thumb techs use: leave it off at least as long as it spent on its side, and never less than 4 hours. This costs you nothing but patience, and skipping it is the single most expensive moving mistake in this entire article.
Once it’s running, give it 24 hours to reach temperature before you judge it. If it still isn’t cooling properly after that, our guide on a refrigerator that runs but doesn’t cool walks through what to check next.
Washing Machines: Shipping Bolts Are Not Optional
If you take one thing from this article, make it this one. Front-load washers ship from the factory with three or four long shipping bolts (also called transit bolts or transport brackets) that pass through the back panel and lock the wash drum rigidly to the cabinet.
In normal use, that drum floats on springs and dampers so it can absorb the violence of a spin cycle. During a move, that same suspension lets an 80-pound steel drum swing freely inside the cabinet. Every bump in the road becomes a hammer blow against the springs, the dampers, and the bearing housing. Move a front-loader without the bolts and you can arrive with a washer that shakes itself across the floor on every spin — or one with a wrecked bearing, which is one of the more expensive repairs on the machine.
Washer Prep
- Find the shipping bolts. They’re often taped inside the manual, in a bag zip-tied to the back, or stored in holes in the rear panel. If you threw them out years ago, order a set for your model — they’re inexpensive, and far cheaper than a bearing job.
- Run a drain or spin-only cycle to empty residual water, then unplug.
- Shut off both supply valves and disconnect the hot and cold hoses. Have a towel and a shallow pan ready; there’s always more water than you think.
- Drain the hoses by holding them low into a bucket, then coil them and put them inside the drum with a towel.
- Pull the drain hose out of the standpipe and drain it too. Cap or bag the end.
- Clean out the drain pump filter if your machine has one — it holds a cup or more of water.
- Install the shipping bolts per the manual, then tape the door shut.
Top-loaders don’t use shipping bolts, but they still have a suspension system, and the same care applies: drain fully, secure the lid, and don’t drop it off the tailgate.
While the hoses are off, look hard at them. Rubber supply hoses have a service life of about five years, and Florida’s hard water and heat are unkind to them. If yours are original and crusty at the fittings, replace them with braided stainless before you reconnect. A burst supply line is the leading cause of catastrophic laundry room flooding — we go into it in our guide on preventing washing machine flooding.
After the move, if the washer starts shaking or walking, don’t assume the worst right away. Nine times out of ten it’s simply not level in its new spot. Our article on why washers shake and vibrate covers leveling the feet properly, which takes about ten minutes.
Dryers: Simple, With One Gotcha
Dryers are the easiest of the major appliances to move — they’re light for their size and there’s nothing inside to spill. This section is about electric dryers. If you have a gas dryer, the gas line disconnect and reconnect must be done by a licensed gas technician; SkyBreeze doesn’t service gas appliances, and this is genuinely not a DIY job.
- Unplug it. On a 240V dryer, check the cord and terminal block for heat damage while you have access — a move is a great time to catch a burnt connection.
- Pull the vent duct off the back. If it’s flexible foil, this is the moment to throw it away and buy rigid or semi-rigid metal duct for the new place.
- Clean the lint trap housing and vacuum out the duct connection while everything is apart.
- Tape the door shut and tape the cord to the back so it doesn’t drag.
- Check whether your new house has a 3-prong or 4-prong dryer outlet. They’re different, and you may need a different cord. Do not use an adapter.
When you reconnect at the new house, keep the duct run as short and straight as possible and don’t shove the dryer flush against the wall — a crushed duct is the fastest way to turn a working dryer into a slow one.
Dishwashers: Water, Then Wires, Then Out
Dishwashers are the most fiddly to disconnect because three different systems come together under the sink and behind the toe kick.
- Shut off the water at the valve under the sink and kill power at the breaker. Dishwashers are frequently hardwired rather than plugged in, so don’t assume unplugging is an option.
- Run a short rinse first so the sump is relatively clean, then sponge out any remaining water in the bottom.
- Remove the toe kick panel to reach the water line and the junction box.
- Disconnect the supply line with a bucket underneath. That braided or copper line is easy to kink permanently — support it and don’t bend it sharply. If it’s old, replace it rather than reusing it.
- Disconnect the drain hose from the disposal or the sink tailpiece, drain it into the bucket, and cap or bag the end.
- Unscrew the mounting brackets from the underside of the countertop or the cabinet sides, then walk the unit out slowly. Lay cardboard on the floor first — dishwasher feet scratch vinyl and wood without any effort at all.
- Tape the racks in place and tape the door shut.
On reinstall, connect the water, run a full cycle, and then get on the floor with a flashlight and check every connection for weeping. Do it again the next day. A slow leak behind a dishwasher can go unnoticed for months and ruin a cabinet base and subfloor — the problem we cover in what causes a dishwasher to leak from the bottom.
Ovens and Ranges: Heavy, Awkward, and Sharp
Again — electric only here. A gas range disconnect requires a licensed gas technician, no exceptions.
- Kill the breaker before you pull the range out. Slide-in and freestanding electric ranges usually plug into a 240V receptacle behind the unit.
- Remove all oven racks and the broiler pan, and pack them separately. Racks rattling around inside will chip the porcelain enamel.
- Tape the oven door shut and, if it’s a glass-top range, put a sheet of cardboard or a moving blanket over the cooktop and tape it down. Glass cooktops crack from surprisingly modest impacts.
- Check for an anti-tip bracket bolted to the floor or wall behind the range. You’ll need to unbolt it to remove the range, and you absolutely need to reinstall one at the new house. It’s a serious safety device, not an optional part.
- Ranges are bottom-heavy and the sheet metal edges underneath are sharp. Gloves, two people, and a dolly.
Wall ovens are a different animal — they’re heavy, they sit in a cabinet cutout, and they’re usually hardwired. That’s a job worth handing off.
Technique: Dolly, Straps, and Not Hurting Yourself
Good technique is mostly about slowing down.
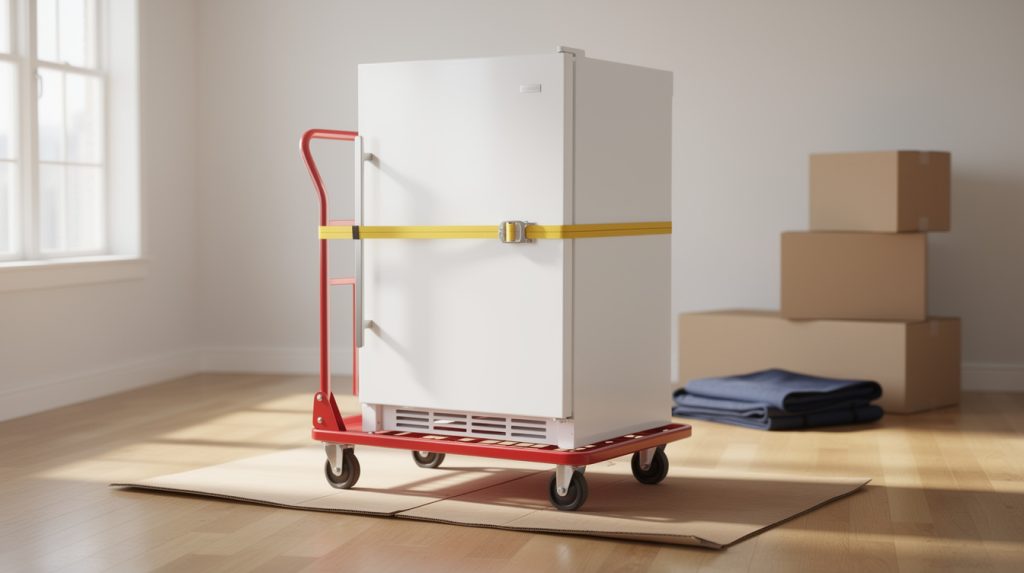
- Use an appliance dolly, not a hand truck. The difference is the ratcheting belt strap and the wider back plate. A regular hand truck will get away from you on a threshold.
- Strap it snug before you tilt. Run the belt around the appliance about two-thirds of the way up and ratchet it tight against the dolly frame.
- Two people, minimum. One steers and takes the weight, one spots the top and watches the corners. Three for a range or a big french-door fridge.
- Protect the floor. Flattened cardboard, an old rug, or sheets of hardboard along the route. Appliance feet and dolly wheels both leave marks.
- Lift with legs, keep the load close, don’t twist. Boring advice, still true, and a lot of moving-day back injuries happen on step three of four.
- Slide, don’t drag. Furniture sliders under the feet let you walk an appliance out from a tight alcove without gouging anything.
- Go down stairs backward, slowly, one step at a time, with the person below controlling the descent.
Reconnecting: Level, Then Leak-Check
Every appliance in this list needs to be level in its new home, and floors in different houses are rarely the same.
- Refrigerator: level side to side, with a very slight tilt back so the doors self-close. Adjust the front feet or rollers.
- Washer: level in both directions, all four feet firmly on the floor with no rock. Push down on each corner; if it moves, adjust. This is the difference between a quiet spin cycle and a machine that migrates.
- Dryer: level, and duct connected without crushing.
- Dishwasher and range: level to the countertop, brackets and anti-tip hardware reinstalled.
Then check for leaks — twice. Run each water-using appliance through a full cycle, then get down with a flashlight and feel every connection with a dry paper towel. Do it again 24 hours later, because a fitting that’s slightly loose often doesn’t show anything on the first cycle.
What to Watch the First Week
Give everything a week of normal use and pay attention to:
- Fridge temperature — it should hold 37–40°F, freezer at 0°F. If it’s not there after 24 to 48 hours, something’s wrong.
- Any new noise from any appliance. New noises after a move usually mean something is loose, out of level, or shifted.
- Damp spots, warped flooring, or a musty smell near the washer or dishwasher.
- The washer’s first full spin cycle — stay and watch it.
- Longer-than-normal dryer cycles, which point at a duct problem in the new setup.
If something isn’t right after a move, it’s usually a small, fixable thing — a leveling foot, a kinked line, a loose connection — but it’s worth sorting out early rather than living with it. SkyBreeze Appliance Repair handles post-move setup problems and repairs on every major brand across Tampa, Wesley Chapel, Lutz, Land O’ Lakes, Shady Hills, Hudson, Dade City, Zephyrhills, and The Villages.
One Last Thought Before You Load the Truck
A move is a natural decision point. If an appliance is already near the end of its useful life, hauling it across the state and reinstalling it may not be worth the effort or the risk. Our appliance lifespan guide and our repair versus replace breakdown can help you decide what’s worth moving and what’s better sold or recycled where it stands.
For everything you are taking with you: measure first, drain everything, bolt the washer, keep the fridge upright, and let it sit before you plug it in. Do those five things and your appliances will arrive working exactly as well as they did when they left.